UNITY TUTORIAL 01

Man at Desk by Pat Grivet from Dribble.

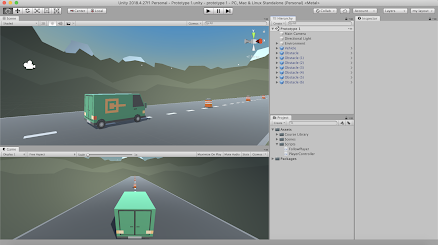
After going through these Unity tutorials, I learned how to download and import assets into Unity which I then used to begin creating a driving simulator game. In the first set of tutorials, I learned how to position objects within the game and adjust the camera for the player's view. I also learned how to navigate around my scene, use the position and rotate tools as well as reorganising my layout. These tutorials were generally easy to understand and follow. However, I still need to get used to the different keys used to navigate around my scene. 

In the second set of tutorials, I learned how to create a C# script which I named "PlayerController" and then applied it as a component to my vehicle which can be found in a list called the hierarchy. By opening the script, I was able to edit the code to allow my vehicle to move forward in the game as well as change its speed. I learned about the RigidBody component which I used to modify the weight of objects. I also learned how to duplicate objects such as the obstacles in my game. I didn’t find anything too challenging and enjoyed learning how to make objects move within the scene.

The third set of tutorials taught me how to add a speed variable to the "PlayerController" script to make the speed of my vehicle easier to adjust. Afterwards, I created a new C# script titled "FollowPlayer" which I added to the main camera. From here, I dragged the vehicle from the hierarchy and into the script's empty player variable. This allowed the camera to follow closely behind the base of the vehicle as it moved. In order to give the player a clearer view of the road, I learned how to add a Vector3 offset variable in the "FollowPlayer" script and then entered the digits of the camera's position. Lastly, I learned how to change the colour that would highlight my layout when in play mode. Once again, the tutorials were easy to follow. I think I need more practice before getting used to and remembering the variables for the scripts. 

Personal screenshot from my Unity3D project.

I'm looking forward to learning how to give the player control of the vehicle to move about the game.

Comments

  1. Hi there, Nadine!!
    I don't know about you but I loved driving a car and being from me hahahah ~Terrible joke :p
    I still need to get used to the different keys and variables too ( it's totally new and different). However, it might take a bit of training but I'm also sure you will make a great game! :D
    LĂ­via Alencar

    ReplyDelete

Post a Comment

Popular posts from this blog

FIRST PLAYABLE

Continuing with the creation of my game, I resized the player character to make them even smaller based on a comment that was left on my last project blog. I also repositioned the trees to make the space slightly narrower and added some flowers to bring some colour into the scene. With reference from the animal feeding game tutorial, I was able to get the player moving left and right by clicking the arrow keys. I brought in rocks and a branch for obstacles but I need to apply a SpawnManager script and get them to spawn randomly during gameplay. I also have to figure out how to get some branches falling from the trees and bringing in power-ups and points too. Screenshot from Unity3D of my game production.

PROTOTYPE

I browsed through the Unity asset store to find a package with nature objects that I could use to set up the scene for my infinite runner game. I downloaded the Nature Starter Kit 2  and started building my scene in Unity. This was a little time consuming but I'm satisfied with the way it turned out. I upscaled the trees and bushes, keeping in my mind my initial idea of gaining inspiration from the movie "The Secret World of Arrietty." I got the character from a tutorial I have completed for this module before and positioned the camera behind it. Screenshot of my work in Unity3D. With reference to the lesson 3 Unity tutorial, I started coding by creating the PlayerController script. I used the AddForce method and allowed the player to jump by clicking the spacebar. I declared two public variables to be able to adjust the gravity and player's jump force. Looking into the player's animator controller, I applied a static running animation. I then added a jumping ani...

GAME FUN

Games can be described by the 3 components Mechanics, Dynamics, and Aesthetics (MDA) or otherwise stated as rules – system – “fun” . The three reading selections this week and the synopsis below all address the term “fun” in relation to game design. There are eight types of Fun outlined by the MDA. These eight are both a source of reference and player experience that blend together in many ways, and essentially what makes a game engaging and enjoyable. Figure 1: Eight kinds of Fun Both Oxford and Merrian dictionaries define Fun as an enjoyment and delight but within the context of a game, it refers to a form of pleasurable entertainment. MDA papers define the '8 kinds of fun';  sensation, fantasy, narrative, challenge, fellowship, discovery, expression, and submission. These remain a source of reference and possibly the most popular list of player interactions combining in various forms to attract each player to a particular game. Nicole Lazzaro presents four types of fun that...